Installing openSUSE Tumbleweed on a Dedibox
By Mathieu CARBONNEAUX
This small tutorial for installing openSUSE Tumbleweed on a Dedibox.
-
TumbleWeed documentation: https://en.opensuse.org/openSUSE:Tumbleweed_installation
-
Tumbleweed Repository: http://download.opensuse.org/tumbleweed/repo/oss/
-
OpenSUSE network installation: https://en.opensuse.org/SDB:Remote_installation
-
Ubuntu’s grub2 documentation: https://help.ubuntu.com/community/Grub2#Configuring_GRUB_2
-
Grub2 documentation on device syntax definition: https://www.gnu.org/software/grub/manual/grub.html#Device-syntax
First step is to install a Linux distribution using the online console installation system, for example Ubuntu.
Then log into the machine and switch to root and download the necessary images for installation.
user@sd-xxxxx :~ # sudo su -
root@sd-xxxxx :~ # cd /boot
root@sd-xxxxx :~ # wget --output-document=vmlinuz.install http://download.opensuse.org/tumbleweed/repo/oss/boot/x86_64/loader/linux
root@sd-xxxxx :~ # wget --output-document=initrd.install http://download.opensuse.org/tumbleweed/repo/oss/boot/x86_64/loader/initrd
Retrieve the machine’s IP via ifconfig (example 192.168.10.10).
root@sd-xxxxx :~# ifconfig
eno1      Link encap:Ethernet  HWaddr xx:xx:xx:xx:xx:xx
          inet addr:192.168.10.10  Bcast:192.168.10.255  Mask:255.255.255.0
          UP BROADCAST RUNNING MULTICAST  MTU:1500  Metric:1
          RX packets:827848 errors:0 dropped:0 overruns:0 frame:0
          TX packets:72354 errors:0 dropped:0 overruns:0 carrier:0
          collisions:0 txqueuelen:1000
          RX bytes:171157583 (171.1 MB)  TX bytes:7488582 (7.4 MB)
root@sd-xxxxx :~ # route -n
Kernel IP routing table
Destination     Gateway         Genmask         Flags Metric Ref    Use Iface
0.0.0.0         192.168.10.1    0.0.0.0         UG    0      0        0 eno1
192.168.10.0    0.0.0.0         255.255.255.0   U     0      0        0 eno1
Find the DNS IP:
root@sd-xxxxx :~ # cat /etc/resolv.conf
# Dynamic resolv.conf(5) file for glibc resolver(3) generated by resolvconf(8)
#     DO NOT EDIT THIS FILE BY HAND -- YOUR CHANGES WILL BE OVERWRITTEN
nameserver 192.168.10.1
search online.net
Find the mduuid of the boot partition:
root@sd-xxxxx :~ # mount | grep boot
/dev/md0 on /boot type ext4 (rw,relatime,stripe=4,data=ordered)
root@sd-xxxxx :~ # mdadm --detail /dev/md0 | grep \/dev
/dev/md0:
      0       8        2        0      active sync   /dev/sda2
      1       8       18        1      active sync   /dev/sdb2
root@sd-xxxxx :~ # lsblk  -f /dev/sdb2
NAME  FSTYPE            LABEL            UUID                                 MOUNTPOINT
sdb2  linux_raid_member 62-210-136-200:0 f10e1a06-0cb2-1aeb-e92f-937476d3ea65
└─md0 ext4                               5b69725e-6914-463e-bf26-6b02a222f59c /boot
The uuid is the name at the end of the sdb2 line: ‘f10e1a06-0cb2-1aeb-e92f-937476d3ea65’.
This is the number to use to define the root but without the ‘-’.
Modify the “/etc/grub.d/40_custom” file and add the following section at the end:
menuentry "openSUSE Tumbleweed" {
  set root='mduuid/f10e1a060cb21aebe92f937476d3ea65'
  linux /vmlinuz.install noapic usessh=1 sshpassword="12345678" install=http://download.opensuse.org/tumbleweed/repo/oss/ hostip=192.168.10.10 netmask=255.255.255.0 gateway=192.168.10.1 nameserver=192.168.10.1
  initrd /initrd.install
}
Edit the /etc/default/grub file to change GRUB_DEFAULT="openSUSE Tumbleweed".
To apply the change:
root@sd-xxxxx :~ # update-grub2
Reboot the server:
root@sd-xxxxx :~ # reboot
The server will restart on the openSUSE installer in SSH mode with x11forwarder.
Then since the installation is done in x11 mode, you need to have a local x11 server and connect via SSH to the server’s IP with the X11Forwarding option enabled.
If you’re on Windows: https://sourceforge.net/projects/xming/ and putty http://www.chiark.greenend.org.uk/~sgtatham/putty/download.html
Configure the x11forwarding option:
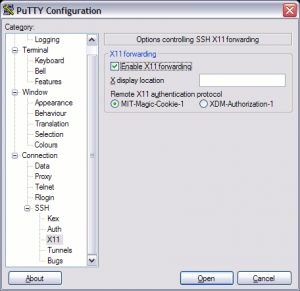
On Linux:
root@sd-xxxxx :~ # ssh -X root@192.168.10.10